8 EXERCISES THAT IMPROVE HIP MOBILITY

WHY IS HIP MOBILITY SO IMPORTANT?
As you all know, fitness is not just about aesthetics. It’s about looking well and staying well. And by staying well, we should be practicing functional exercises to improve our quality of life. These workouts should be designed to improve our range of motion and allow us move more freely and easily. Life is better when feeling less muscular tension and tightness. When we talk about this subject, what could be more important than training your hips?
We use our hips when performing almost every movement with our lower body. They’re also needed for many movements we initiate with our upper body. When we jump, twist, step, pick things up, or even get out of bed. When it comes to aesthetics, it’s impossible to take your athletic performance to the next level without strong functional hips. The ability to squat beyond 45 degrees, recruit all the needed muscles during a deadlift, or even do a basic step up. When the hips are tight, it essentially affects our lives. All the activities mentioned seem hard….and yes if it gets bad, getting out of bed is one of them.
“Tight hips” can cause a serious knock on effect and a lot of health issues. They affect our movement patterns and force us to overcompensate with different body parts and muscle groups. As a result, this can cause injury to our spine, pelvis, knees, and even cause trouble internally with our organs. The list goes on.
So how do we avoid these issues or counteract any problems that have already begun? The answer is designing a program that will enhance hip mobility and increase flexibility.
WHAT’S THE BEST WAY TO DESIGN A HIP MOBILITY PROGRAM?
There are a couple of factors to consider when designing a hip mobility program. Diversity is key. Combining exercises that target the hip flexors, glutes, and all their supporting muscles in the pelvic region is one of them. Secondly, you’ll want to include exercises that enable you to move through different planes of motion. By doing this, our hips benefit from more movement and become more functional. It will develop all the needed movements performed by the joint: hip flexion, extension, abduction, adduction, external rotation, internal rotation.
Today, we will run through 8 effective hip exercises that will help achieve this.
All you need for this routine is an exercise mat.

90/90 HIP STRETCH
HIP MOBILITY EXERCISE #1
MUSCLES WORKED: Gluteus Maximus, Gluteus Minimus, Piriformis, Hip Flexors, Quadriceps
Most hip exercises will mainly work the joint either internally or externally. The 90-90 stretch is a versatile and effective drill. It performs both these functions simultaneously. It does this while recruiting a variety of muscles around the hips and pelvis. For anyone that feels challenged with limited hip mobility, this exercise is very beneficial and should be done on a regular basis. Leaning forward from its “pigeon pose” position, the 90-90 stretch is great for strengthening the hip flexors (abductors, adductors) and stabiliser muscles (gluteus minimus). While reducing tightness and increasing mobility in the hips, the stretch is also great for balance. Having a functional gluteus minimus increases our ability to perform unilateral exercises (balancing on one leg). The 90-90 hip stretch also works the piriformis muscle. This muscle supports lateral rotation of the hip joint and side movements performed by your thighs. For its wide range of benefits, this exercise has become very popular. It’s often recommended by physiotherapists and fitness professionals to people experiencing “tight hips”.
HOW TO DO:
Starting with the right leg first (as seen above)
Sit with your “right knee” bent at a 90 degree angle in front of you. You calf should be perpendicular to your body and the sole of your right foot facing left. Your right leg should be resting flat on the floor and torso upright.
On the left side of you body, place your “left knee” on the floor. Bend your left leg also to a 90 degree angle, so that the sole of your left foot faces behind you. Keep this leg flat on the floor also.
As you lean forward, try keep your legs and butt cheeks on the floor.
Hold for 30 seconds to 1 minute. Repeat by leaning to the left and right hand side. This targets more muscles in the hips.

ISOMETRIC SQUAT ROTATIONS
HIP MOBILITY EXERCISE #2
MUSCLES WORKED: Glutes, Quads, Hip Flexors, Adductors, Erector Spinae
Isometric squat rotations help to improve internal rotation of the hip. This mobility exercise promotes blood flow and improves circulation in the pelvic area. While rotating in a deep squat position, we are strengthening various muscles that support all hip movements including gluteus medius and minimus, TFL (outer hip), and adductor longus, brevis, and magnus (inner thighs). Apart from relieving tight hip flexors, this exercise is also great for reducing tightness in the knees and lower back.
HOW TO DO:

Start in a deep squat position (deep as possible).
Rotate one knee inward and towards the ground. With the other knee, rotate it outwards to twist and mobilise the hips.
Keep your hands clasped below chin height. Maintain neutral spine while engaging your glutes and core to stay balanced.
This stretch can be done sitting on a small stool if you cannot get into a comfortable squat position. Don’t hold the end position very long. Keep moving!

LUNGE WITH SPINAL TWIST
HIP MOBILITY EXERCISE #3
MUSCLES WORKED: Hip Flexor, Quadriceps, Upper Back (T-Spine)
The “lunge with a spinal twist” is an effective exercise for mobilising your hips. The movement itself stretches and strengthens the glutes, hamstrings, quads and hip flexors. The added spinal twist focuses on external rotation of the hip, another movement pattern which is often overlooked. This specific exercise has been known to relieve lower back pain, which may be caused by tight hips.
HOW TO DO:

Stand with both feet together at one end of the mat.
Lunge forward with your right foot. Lean forward with your torso as you place your left hand on the floor opposite your right leg.
Bend your right knee so it’s positioned at 90 degrees. Keep your left leg straight behind you while staying on your toes. Your left knee should only bent.
Place your “right hand” next to your “left hand on the floor. Twist your upper body to the right as you extend your right arm above you. Look towards the ceiling as you do this movement.
Hold your arm in the air for 2-3 seconds. Slowly lower your hand back to the starting position.
Aim for 6-10 reps before performing the exercise on the opposite side.

LATERAL LUNGE
HIP MOBILITY EXERCISE #4
MUSCLES WORKED: Quadriceps, Gluteus Medius, Hip Adductors and Abductors
The lateral lunge is a unique exercise. It puts a lot of emphasis on targeting the sides of your glutes and quadriceps. We typically perform the lunge in a forward or reverse motion. In order to improve overall mobility, we need to practice hip exercises through different planes of movement. When performing the exercise from a side position, it’s great for targeting the gluteus medius and inner/outer thighs. The gluteus medius is the most important muscle for stabilising the hip joint when doing any activity. The inner and outer thigh muscles are attached to the pelvis. Training these muscles is essential for functional movements such as hip flexion and extension. Strengthening the adductors (inner thighs) is also crucial for stabilising the knee joints, lower back, and reducing the risk of injury.
HOW TO DO:
Starting with your right leg (stepping to the right)

Stand tall with your feet together. Keep them straight.
Take a big step (lunge) to the right side. Step about half a yard wider than shoulder width apart. Make sure to keep your torso upright. Lower yourself until your right knee is bent at a 90 degree angle. Keeping your trailing leg (left leg) straight.
Keep your hands clasped just under chin height while performing the movement.
Drive your body weight through your right heel to return to your starting position.

BRETTZEL STRETCH
HIP MOBILITY EXERCISE #5
MUSCLES WORKED: Obliques, Glutes, Quads, Hip Adductors, Erector Spinae, Posterior Deltoids, Rhomboids
The Brettzel Stretch is very beneficial for improving both thoracic and hip mobility. By rotating our body during the stretch, we reduce tightness, strengthen, and increase range of motion in our back and shoulders. The exercise is excellent for targeting muscles in the posterior chain such as the rhomboids and posterior deltoids when staying flat on the floor. This makes it a handy routine for relieving muscular stress in the postural muscles. The Brettzel stretch does all this while stretching out your hip flexors and quads. A great routine for targeting all the muscles from head to toe and improving both hip flexion and extension.
HOW TO DO:
Starting on your left side first
On a mat, lie on your left side and look straight ahead.
Bending your “right knee”, raise your right leg (top leg) up to hip level (90 degrees). Try keep your right leg flat on the floor. You can use your left hand to assist you.
Bend your left leg at a 45 degree angle and bring it behind you. Catch your left foot with your right hand and hold it. It should be close to your buttocks.
Slowly rotate your torso and try to rest your back flat on the mat. Try to keep your shoulders on the floor also.
Hold the stretch for 30 seconds and repeat it on the opposite side.
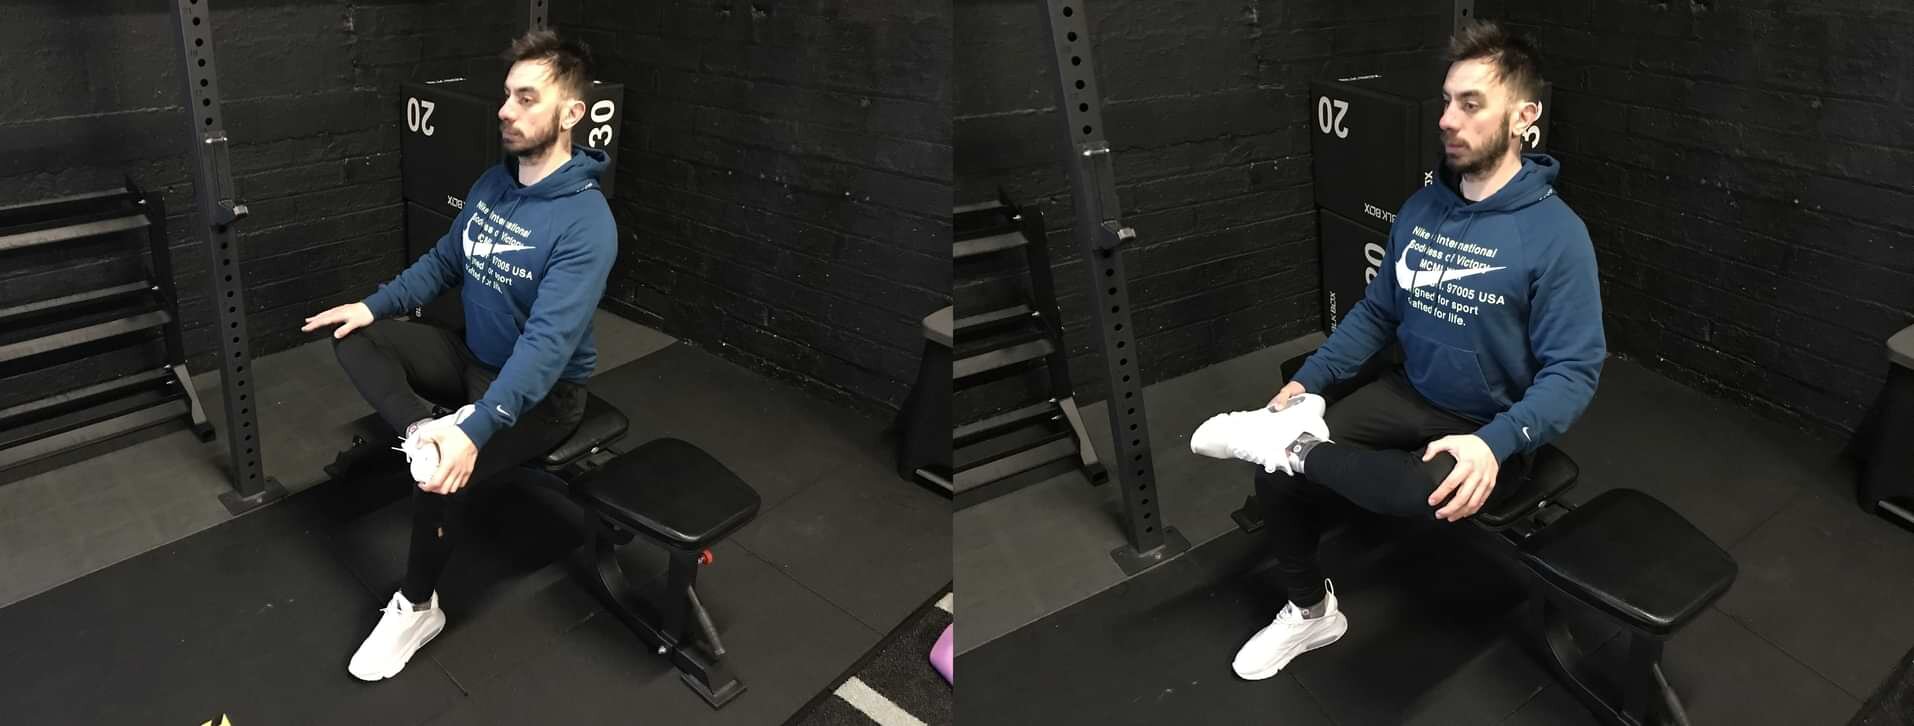
SEATED FIGURE 4 STRETCH
HIP MOBILITY EXERCISE #6
MUSCLES WORKED: Glutes, Piriformis, Hip Flexors
The “Seated Figure 4” stretch is an effective exercise for combating “tight hips”. This routine is simple to perform and significantly improves flexibility and mobility in the hips and glutes. If looking to increase depth and control of your squat or lunge, or even the ability to do higher “step ups”, then make it a habit to include this stretch routine after your workout. When pushing down on your knee (or leg) during this exercise, you can feel a deep burn beyond your glutes. The muscle being heavily engaged is the piriformis. This makes the seated figure 4 stretch a useful routine for promoting hip rotation and stability.
HOW TO DO:
Sit straight on a bench with your torso upright and feet hip width apart.
Starting with the right leg, place your right foot over your left thigh. Your right leg should be facing perpendicular to the body and right foot facing away to the left of the body.
Bring the right foot back towards the body as much as you can. It should be resting on your upper thigh.
Holding your foot with your left hand, apply some downward pressure to the “right knee” with your right hand.
Hold for 30 seconds and perform on the opposite leg.

DEEP SQUAT HOLD
HIP MOBILITY EXERCISE #7
MUSCLES WORKED: Gluteus Maximus, Quads, Hip Flexors, Hip Adductors, Erector Spinae, Rear Deltoids
The deep squat is a natural position which gets very little exposure. Sitting at a desk all day, we don’t extend our hips enough beyond 90 degrees. When seated for long periods, the muscles tend to become very inactive and tight. The deep squat is an excellent movement pattern to expose any limitations around the hip. Practicing and perfecting its technique can do wonders. It will build flexibility in your hip flexors, reduce pain in your knees and lower back while running (or resistance training), and will improve the form of your squat. Maintaining a neutral spine (straight back) during a deep squat develops your postural muscles and reduces tightness in the upper body. The deep squat is a full body workout, offering a blend of strength, flexibility, and functional training.
HOW TO DO:
Start with your feet a little wider than shoulder width apart. You can angle your feet slightly outwards.
Bring both hands together and keep them in front of your chest. (clasped or in a prayer like position).
Keeping your back straight, chest up, and shoulders square, begin squatting to the floor.
Looking ahead, keep your heels planted on the floor and slightly bring your shoulders back.
Aim to hold for 30 seconds - 2 minutes
For progression, drive your elbows into the knees. Put extra emphasis on externally rotating the hip joint.

FROG STRETCH
HIP MOBILITY EXERCISE #8
MUSCLES WORKED: Hip Flexors, Hip Adductors, Erector Spinae, Abdominals
The frog stretch is a ‘holding pose’ that’s easy to perform. Practicing this exercise on a regular basis helps to open up the muscles around the hips and stretch the inner thighs (hip adductors). It also strengthens the muscles in the lower back and reduces tightness. Opening up the hips, the frog pose also reduces strain on the knee joints.
HOW TO DO:
Start by coming on to all fours.
Position your knees directly under your hips. Your hands should be aligned with your shoulders.
Keeping both legs positioned at 90 degrees, slide both knees outwards from the sides of the mat. Move them out as far as possible. Keep your toes pointing away from your body (lateral).
Transition by transferring your hands with your elbows on the floor.
As you tuck as low as you can, try to move your knees inward as you contract the muscles of your inner thighs (hip adductors). Squeeze and hold for 10 seconds. Relax and breathe deep when performing.
Relax your muscles as you move forward.
Repeat the exercise 8-10 times.
Articles Of Interest:
If you enjoyed this article, check out our article on why it’s important to maintain muscle mass.
Or check out more of our workouts or articles here.
Alternatively, please reach out to our team today if interested in personal training.
Workouts